Workflows
Many analyses can be constructed as a graph to depict all the steps that are made during the analysis. This graph of an analysis is called a workflow. There are many benefits to creating a workflow:
- Construct entire analysis workflow and view it before running.
- Carefully records every step, so you know exactly what you did.
- Can share the entire analysis with someone else (good for reproducibility).
TenetoWorkflow allows you to define a workflow object and then run it. A workflow consists of a directed graph. The nodes of this graph are different Teneto functions. The directed edges of the graph is the sequence the pipeline is run in.
The workflows function around the TenetoBIDS or TemporalNetwork classes. Any analysis made using those classes can be made into a workflow.
There are three different types of nodes in this graph:
root nodes: These are nodes that do not depend on any other nodes in the analysis. These are calls to create a _TenetoBIDS_ or _TemporalNetwork_ object.
non-terminal nodes: These are nodes that are intermediate steps in the analysis.
terminal nodes: These are the final nodes in the analysis. These nodes will include the output of the analysis.
Understanding the concept of root and terminal nodes are useful to understand how the input and output of TenetoWorkflow.
Creating a workflow
We are going to create a workflow that does the following three steps:
- Creates a temporal network object (root node)
- Generates random data (non-terminal node)
- Calculates the temporal degree centrality of each node (terminal node)
We start by creating a workflow object, and defining the first node:
>>> from teneto import TenetoWorkflow
>>> twf = TenetoWorkflow()
>>> nodename = 'create_temporalnetwork'
>>> func = 'TemporalNetwork'
>>> twf.add_node(nodename=nodename, func=func)
Each node in the workflow graph needs a unique name (argument: nodename). If you create two different TemporalNetwork objects in the workflow, these need different names to differentiate them.
The func argument specifies the class that is initiated or the function that is run.
There are two more optional arguments that can be passed to add_node: depends_on and params. We will look at those later though.
By adding a node, this creates an attribute in the workflow object which can be viewed as:
>>> twf.nodes
{'create_temporalnetwork': {'func': 'TemporalNetwork', 'params': {}}}
It also creates a graph (pandas dataframe) which is found in TenetoWorkflow.graph.
>>> twf.graph
    i   j
0   isroot  create_temporalnetwork
Since this is the first node in the workflow, _isroot_ is placed in the _i_ column to signify that _create_temporalnetwork_ is the root node.
Now let us add the next two nodes and we will see the params argument add_node:
>>> # Generate network node
>>> nodename = 'generatenetwork'
>>> func = 'generatenetwork'
>>> params = {
    'networktype': 'rand_binomial',
    'size': (10,5),
    'prob': (0.5,0.25),
    'randomseed': 2019
    }
>>> twf.add_node(nodename, func, params=params)
>>> # Calc temporal degree centrality node
>>> nodename = 'degree'
>>> func = 'calc_networkmeasure'
>>> params = {
    'networkmeasure': 'temporal_degree_centrality',
    'calc': 'time'
    }
>>> twf.add_node(nodename, func, params=params)
Here we see that the params argument is a dictionary of _*kwargs_ for the _TemporalNetwork.generatenetwork_ and _TemporalNetwork.calc_networkmeasure_ functions.
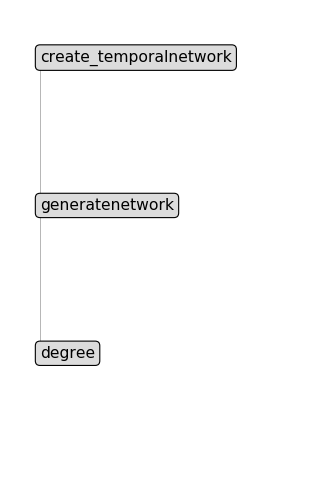
Now we have three nodes defined, so we can look at the TenetoWorkflow.graph:
>>> twf.graph
    i   j
0   isroot  create_temporalnetwork
1   create_temporalnetwork generatenetwork
2   generatenetwork    degree
Each row here shows the new node in the _j_-th column and the step preceding node in the _i_-th column.
The workflow graph can be plotted with:
>>> fig, ax = twf.make_workflow_figure()
>>> fig.show()
(Source code, png, hires.png, pdf)

Running a workflow
Now the workflow has been defined, it can be run by typing:
>>> tfw.run()
And this will run all of steps.
Viewing the output
The output of the final step will be found in TenetoWorkflow.output_[<nodename>].
The nodes included here will be all the terminal nodes. However when defining the TenetoWorkflow, you can set the argument, _remove_nonterminal_output_ to False and all node output will be stored.
The output from the above is found in:
>>> tfw.output_['degree']
...
More complicated workflows
The previous example consists of only three steps and occurs linearly. In practice analyses are usually more complex. One typical example is where multiple parameters are run (e.g. to demonstrate that a result is dependent on that parameter).
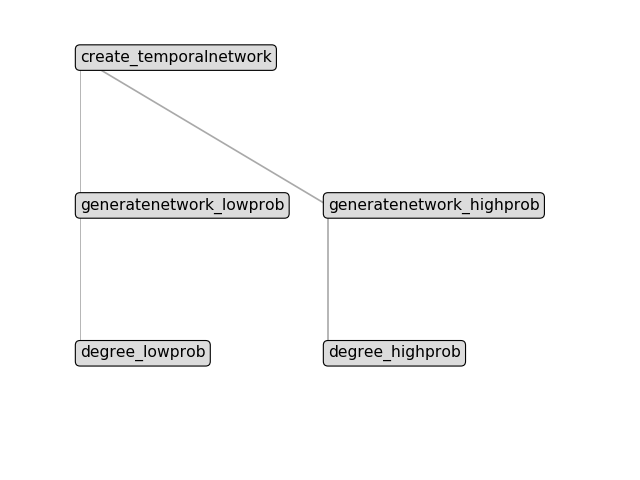
Here we define a more complex network where we generate two different networks. One where there is a high probability of edges in the network and one where there is a low probability.
When adding a node, the node refers to the last node defined unless depends_on is set. This should point to another preset node.
Example:
First define the object.
>>> from teneto import TenetoWorkflow
>>> twf = TenetoWorkflow()
>>> nodename = 'create_temporalnetwork'
>>> func = 'TemporalNetwork'
>>> twf.add_node(nodename=nodename, func=func)
Then we generate the first network where edges have low probability.
>>> nodename = 'generatenetwork_lowprob'
>>> func = 'generatenetwork'
>>> params = {
    'networktype': 'rand_binomial',
    'size': (10,5),
    'prob': (0.25,0.25),
    'randomseed': 2019
    }
>>> twf.add_node(nodename, func, params=params)
Then add the calculate degree step.
>>> nodename = 'degree_lowprob'
>>> func = 'calc_networkmeasure'
>>> params = {
    'networkmeasure': 'temporal_degree_centrality',
    'calc': 'time'
    }
>>> twf.add_node(nodename, func, params=params)
Now we generate a second network where edges have higher probability. Here depends_on is called and refers back to the create_temporalnetwork node.
>>> nodename = 'generatenetwork_highprob'
>>> func = 'generatenetwork'
>>> depends_on = 'create_temporalnetwork'
>>> params = {
    'networktype': 'rand_binomial',
    'size': (10,5),
    'prob': (0.75,0.1),
    'randomseed': 2019
    }
>>> twf.add_node(nodename, func, depends_on, params)
Now we can calculate temporal degree centrality on this network:
>>> nodename = 'degree_highprob'
>>> func = 'calc_networkmeasure'
>>> params = {
    'networkmeasure': 'temporal_degree_centrality',
    'calc': 'time'
    }
>>> twf.add_node(nodename, func, params=params)
And this workflow can be plotted like before:
>>> fig, ax = twf.make_workflow_figure()
>>> fig.show()
(Source code, png, hires.png, pdf)
